EcoSport’s Alternator Replaced

The alternator of our 2017 MT EcoSport failed at 122,000 km, after 7 years of daily driving. It happened without warning, as you would expect with failing alternators. Considering the age of our vehicle and the total road distance travelled, this problem was expected to happen. When the alternator fails, it will stop providing the car with electrical power. With the engine running, the car’s system voltage will drop from the normal 13 to 14 volts to about 12 volts or lower, indicating that the engine now relies on the remaining battery power to keep functioning. With the battery not recharging, the voltage will continue to rapidly drop to about 10 volts. The car will then alert you with errors on the dashboard (such as the ABS error light, Airbag error light, and many others) since not enough power is being sent to the various modules. If you do not have a voltmeter display module installed, it may be difficult to instantly recognize an alternator failure. With a failed alternator, you may still be able to start the car 3 to 5 times if you have a good battery, but the voltage will drop rapidly within minutes. As soon as it drops to 10 or 9 volts, the engine will shut down. It is unsafe to drive a car with a faulty alternator since the engine can shut down any moment. In the case of our EcoSport, we were able to start the car four times and drive the car to a safe location for about 10 minutes before shutting down completely.

Replacement alternator (left) and the faulty stock alternator (right) for our EcoSport

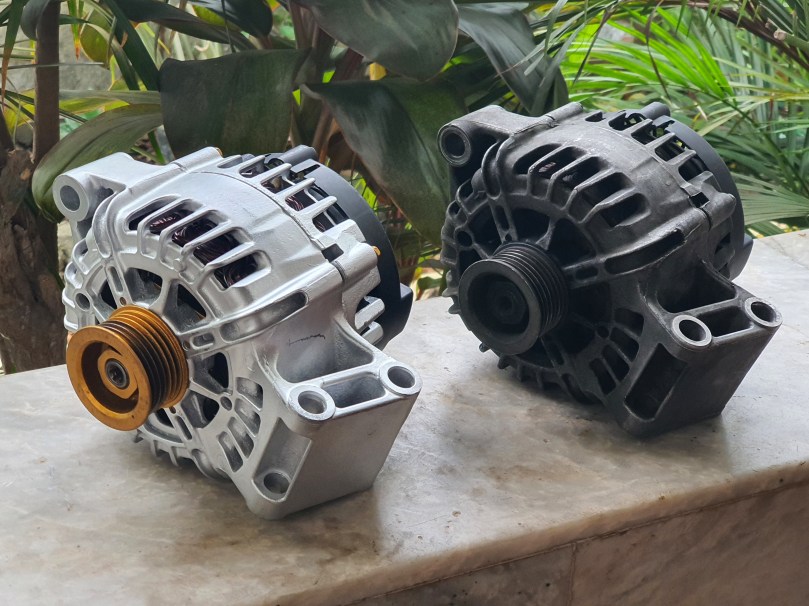
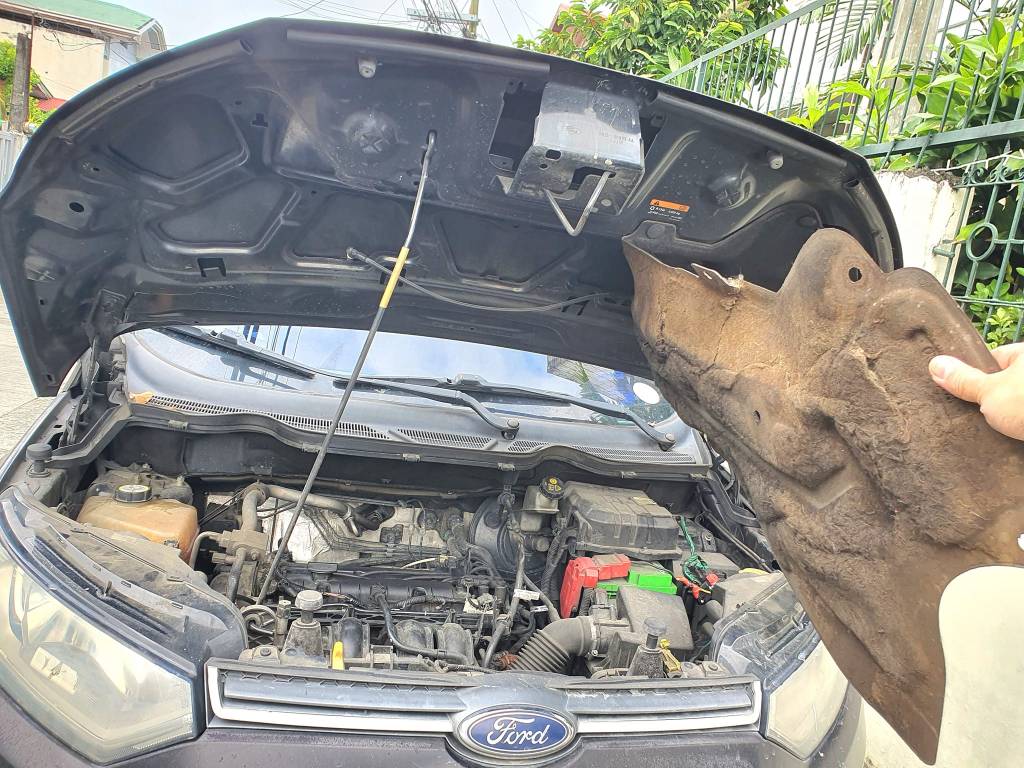
Using some basic tools, we were able to remove the three screws that hold the alternator in place. The drive belt will need to be removed. We’ve decided to just cut the belt and replace it with a new one since it has been in use for about 40,000 km already. In the interest of completing the repair in the shortest time possible, we simply ordered a replacement alternator from a local supplier and have it delivered the same day. The next day, we installed the replacement alternator and the repair was complete within a few hours.

To view all EcoSport tutorial videos, click here.
To subscribe and receive posts about our beloved EcoSport, click here.

ECOSPORT DIY SERIES
Isa na namang kaalaman sa ating minamahal na EcoSport
© Anthony Urbano (Manila, Philippines)

EcoSport’s Hood Insulator Removed

I have removed the hood insulator of our EcoSport, 7 years after its purchase (at 115 000 km). I noticed that the foam started to lose its rigidity and began sagging towards the engine components. If not removed or fixed, its weight and considering the hood vibrations when driving, could cause damage to the wires and hoses in the engine bay. The foam serves as a noise dampener as it absorbs some engine noise, but primarily, it prevents the hood from resonating too much and becoming a soundboard. I think it serves more as a noise deadener rather than a heat insulator since the only component it could be protecting from heat would be the windshield sprinkler system, and perhaps the hood’s paint.

The foam is secured with plastic clips. To remove the foam insulator, just pull it until it detaches.

I was informed by fellow EcoSport owners that their Ambiente variants do not have a noise dampener installed. This means that there should be no issues if this part were removed and not replaced. There is however, a slight increase in engine noise as heard from the cabin, but still not loud enough to cause discomfort or issues. This EcoSport hood insulation foam can be purchased in local stores for 1800 pesos (about 35 USD in 2023) and it comes with supplied plastic clips for easy installation. I have yet to determine if I would be bothered with the increased noise as I prefer hearing the engine a bit more, particularly, since our EcoSport is a manual transmission.

To view all EcoSport tutorial videos, click here.
To subscribe and receive posts about our beloved EcoSport, click here.

ECOSPORT DIY SERIES
Isa na namang kaalaman sa ating minamahal na EcoSport
© Anthony Urbano (Manila, Philippines)

Shifter Knob replaced after 6 Years

After about 6 years, we have replaced the shifter knob of our 2017 EcoSport Trend MT. The rubber started to peel off and while it is still usable, we’ve decided to replace it with a new one. The knob was not easy to remove and you may need to use some very good pliers to pry out the plastic components holding the knob (and the boot cover) in place.

Related links:
Shifter Knob Button
Replacing the Shifter Cover

To view our EcoSport’s road adventures, click here.
To view all EcoSport tutorial videos, click here.
To subscribe and receive posts about our beloved EcoSport, click here.

ECOSPORT DIY SERIES
Isa na namang kaalaman sa ating minamahal na EcoSport
© Anthony Urbano (Manila, Philippines)

DIN60 Battery Installed in EcoSport

Our EcoSport’s first battery was a stock DIN44 battery, which after 2.5 years, replaced by a DIN55 battery. After another 2.5 years, we are replacing the battery with a DIN60. Apparently, the battery compartment of EcoSport can fit DIN44, DIN55, and DIN60 batteries.

DIN60 battery fits in EcoSport’s battery compartment

Replace the battery at regular intervals to minimize the chance of a failed engine start due to a battery that is unable to hold enough charge. In the case of our EcoSport, we prefer to replace the battery every 2.5 years.

Related link: When to Replace Your Car’s Battey (EcoSport)

To view all EcoSport tutorial videos, click here.
To subscribe and receive posts about our beloved EcoSport, click here.

ECOSPORT DIY SERIES
Isa na namang kaalaman sa ating minamahal na EcoSport
© Anthony Urbano (Manila, Philippines)

Replacing EcoSport’s Fuel Filter

EcoSport’s fuel filter must be replaced every 40,000 km. To replace the filter, carefully remove the two fuel line connectors and unscrew an 8 mm bolt that clamps the filter in place.

To watch a video on how to replace EcoSport’s fuel filter, head directly to Replacing EcoSport’s Fuel Filter.

To view all EcoSport tutorial videos, click here.
To subscribe and receive posts about our beloved EcoSport, click here.

ECOSPORT DIY SERIES
Isa na namang kaalaman sa ating minamahal na EcoSport
© Anthony Urbano (Manila, Philippines)

Removing EcoSport’s MAF Sensor

The amount of air flowing into the engine is measured and monitored using a sensor called the Mass Air Flow sensor or the MAF sensor. The MAF sensor provides input to the engine in order to help caculate the optimal fuel-to-air ratio in various engine load conditions.

To watch a video on how to remove an EcoSport’s mass air flow sensor, head directly to Removing EcoSport’s MAF sensor.

To view all EcoSport tutorial videos, click here.
To subscribe and receive posts about our beloved EcoSport, click here.

ECOSPORT DIY SERIES
Isa na namang kaalaman sa ating minamahal na EcoSport
© Anthony Urbano (Manila, Philippines)

Replacing EcoSport’s Resistor Block

EcoSport’s auxiliary fan uses a high-wattage resistor in series to run at low speeds, through a component called the resistor block. With a damaged resistor block, the auxiliary fan loses its low speed setting and thus, compensates by pulsing at high speeds for short intervals, alternating full speed and off for several seconds at a time.

To watch a video on how to replace an EcoSport’s resistor block, head directly to Replacing EcoSport’s Resistor Block.

To view all EcoSport tutorial videos, click here.
To subscribe and receive posts about our beloved EcoSport, click here.

ECOSPORT DIY SERIES
Isa na namang kaalaman sa ating minamahal na EcoSport
© Anthony Urbano (Manila, Philippines)

Problem with Our EcoSport’s Lug Nuts

Lately, it has become more and more difficult to remove the tires due to a problem with our EcoSport’s lug nuts. The issue appears to be due to the lug nut’s thin metal sleeve, which once damaged, makes removal extremely difficult. After not being able to remove one of the tires during a road emergency, I’ve finally decided to replace the lug nuts.

To watch a video where I discussed the problematic lug nuts of our EcoSport, head directly to Problem with Our EcoSport’s Lug Nuts.

To view all EcoSport tutorial videos, click here.
To subscribe and receive posts about our beloved EcoSport, click here.

ECOSPORT DIY SERIES
Isa na namang kaalaman sa ating minamahal na EcoSport
© Anthony Urbano (Manila, Philippines)

Replacing EcoSport’s Spark Plugs

As part of preventive maintenance procedure, EcoSport’s spark plugs must be replaced (or restored to proper specifications) every 40,000 kilometers. To remove and install the spark plugs, you will need a tool called a spark plug wrench.

To watch a video on how I replaced the spark plugs of our EcoSport, head directly to Replacing EcoSport’s Spark Plugs.

To view all EcoSport tutorial videos, click here.
To subscribe and receive posts about our beloved EcoSport, click here.

ECOSPORT DIY SERIES
Isa na namang kaalaman sa ating minamahal na EcoSport
© Anthony Urbano (Manila, Philippines)

Removing EcoSport’s Cowl Cover

The catch basin that collects and diverts flowing water from the windshield when it rains is called the cowl. The cowl must be cleaned regularly (every few years) to ensure it is not clogged and effectively channels the water away from the engine. To clean the cowl, simply remove the cover, which is secured by some screws and clips. Disassembly and reassembly (for cleaning purposes) only takes a few minutes.

To watch a video on how I removed the cowl cover of our EcoSport, head directly to Removing EcoSport’s Cowl Cover.

To view all EcoSport tutorial videos, click here.
To subscribe and receive posts about our beloved EcoSport, click here.

ECOSPORT DIY SERIES
Isa na namang kaalaman sa ating minamahal na EcoSport
© Anthony Urbano (Manila, Philippines)